

We love a grand finale and the more spectacular the better. But not everyone is such a dessert extrovert.
If that sounds like you, then we have some easy options.
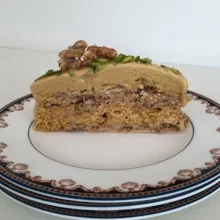
Try using an individual component of our Baklava Meringue and Honey Ice Cream Cake to make a simpler dessert.
For example the meringue layers are a brown sugar meringue mix with chopped walnuts and pistachios folded through and can be made days before and stored in an airtight container. You can divide the meringue mixture into three instead of the two in our recipe then simply layer and top with whipped cream and decorate with seasonal fruit. A layered, nutty pavlova with a fruity finish.
You could purchase some of the components.
We love our honey ice cream but if you don’t fancy making your own, then an appropriately flavoured good quality purchased variety will do nicely.
We’ve decorated our cake with home made honeycomb, candied walnuts and slivers of pistachio, however, honeycomb is easy to purchase and nuts, well they’re easy too.
If you do decide to go the whole hog and make our recipe in its entirety, then the bonus is that it can be made up to two weeks in advance.
A grand finale - not hard at all.
Rosie

BAKLAVA MERINGUE AND HONEY ICE CREAM CAKE
Serves 12-14
Meringue Layers
225 gm (about 6) egg whites
¼ teaspoon cream of tartar
250 caster sugar
70 gm brown sugar
1.5 teaspoons white vinegar
2 teaspoons cornflour
50 gm walnuts, finely chopped
50 gm pistachios, finely chopped
½ teaspoon cinnamon powder
Preheat oven to 150°C. Trace two 18cm circles onto non-stick baking paper and place, pencil side down (otherwise the pencil will transfer to the meringue), onto an oven tray.
Place egg whites in a bowl over hot-ish water until they are quite warm. Whisk them with the cream of tartar until medium peaks form.
Meanwhile, sift the caster and brown sugars together. Mix chopped walnuts, pistachios and cinnamon together.
Gradually add the sugars to the egg whites, whisking continuously until firm and glossy. Fold in the vinegar then the cornflour and finally the nut mix.
Spread half the meringue onto one of the circles and the remainder onto the second circle.
Place in the oven, reduce the temperature to 120°C and bake until crisp, approximately 90 minutes. Turn off the oven, leaving the door closed until the meringue has cooled completely. Several hours or overnight.
Honey Ice Cream
200 gm caster sugar
120 ml water
175 gm honey
900 ml pure cream
15 egg yolks
Dissolve 100gm of sugar with the water and boil until it reaches a golden caramel colour (about 8 minutes). Add the honey and cook to a dark caramel – about a further 6-8 minutes.
Bring 450ml of the cream to a boil over medium high heat.
Meanwhile, whisk yolks and remaining 100gm sugar in a heatproof bowl until pale and thick, about 4-5 minutes.
Pour hot cream over yolk mixture whisking continuously to combine.
Add honey caramel mixture and stir to combine. Pour into a clean saucepan and stir continuously over a low heat until the mixture coats the back of a spoon thickly.
Strain through a fine sieve into a bowl placed over ice. Cool completely.
Whisk remaining 450ml cream until soft peaks form and fold through the cooled custard. Churn in an ice cream machine according to manufacturer’s instructions. You may need to do this in two batches.
To Assemble
Line a 23cm cake tin or ring with non-stick baking paper. Place one meringue disk at the base.
Spread half the ice cream over the disk ensuring ice cream goes down between the meringue and sides of the tin as well as covering the meringue. Top with the remaining meringue disk, pressing lightly into the ice cream. Top with the remaining ice cream.
Cover with plastic wrap and freeze overnight.
The cake can be made to this point up to two weeks ahead.
To Serve
Candied walnuts and/or pistachios slivers
Honeycomb
Seasonal fruit
Place a serving plate in the freezer for 10 minutes.
To un-mould the cake, carefully run a knife around the sides in between the tin and the baking paper and remove the cake from the tin. Remove the baking paper and transfer the cake to the cold serving plate.
This can also be done ahead of time and stored, covered, in the freezer.
When ready to serve decorate with the candied nuts and/or honeycomb or simply some seasonal fruit.